Creating a Virtual Machine
Doing CTF or Red Team work on your personal machine is like staring into the sun. You might get away with it for a second but you're going to regret it.
During a CTF you will be downloading untrusted tools and connecting to potentially risky networks. A virtual machine isolates your system and adds a critical layer of protection. It also makes cleaning up after a breeze.
Virtual Box
To run a virtual machine, you'll need a hypervisor. A hypervisor is software that emulates hardware, allowing you to run separate operating systems isolated from your main system.
You can use other solutions, but this is a dependable starting point.
Guided Tour
If you've never done this before, follow along with this video for your first time.
Thanks Chad!
Next Time
If this isn't your first time running a VM, consider using Debian as the guest OS.
Debian
Debian is a free, open-source Linux distribution known for its stability, simplicity, and huge package repository.
Debian is the foundation for a lot of other distributions you might have used, like Ubuntu and Kali, but without all the extra layers. Debian focuses on clean installs, minimal defaults, and giving you full control over how your system is built and maintained.
Download
- Download a stable Debian ISO
Why not Kali?
Debian is a strong choice because it’s stable, production-ready, and encourages you to learn the way Linux actually works.
You’ll need to install tools like msfconsole, impacket, and chisel
yourself. It's a small barrier that teaches you where things come from, how to
get the latest versions, and how to set up any machine for real work.
You don’t need an all-in-one distro loaded with junk and overly configured.
Install
When in doubt, stick to the default options as you move through the installer menus. Debian’s defaults are safe, clean, and exactly what you want for a first build.
If you choose to install a desktop environment:
- XFCE — lightweight, fast, and a good choice for VMs.
- GNOME — the default, polished and a bit heavy.
- KDE Plasma — sleek and customizable, but heavier on resources.
- Cinnamon — simple, modern, easy to use.
If you don't pick any desktop environment, Debian will without one.
Guest Additions
In the VirtualBox menu of the running VM, select the "Devices" dropdown and select: Insert Guest Additional CD Image. You'll probably want to turn on a shared clipboard while you're in there.
Then, in a terminal of the Debian machine:
# become root
su -

# You may need to mount the disk image, run this
mount /media/cdrom

# AMD 64 processor?
sh /media/cdrom0/VBoxLinuxAdditions-amd64.run
# ARM 64 processor? (M series Macs)
sh /media/cdrom0/VBoxLinuxAdditions-arm64.run

## Restart the VM
reboot
After this your clipboard integration should work, and hopefully the resolution will automatically resize to the window.
Basic VM Network Configuration
Virtual machines need network access to be useful.
VirtualBox provides several networking modes, each with different use cases and security implications.
Changing Network Settings
- Power off your VM
- Right-click the VM and select "Settings"
- Go to the "Network" tab
- Select the adapter you want to configure
- Choose the network mode from the dropdown
- Click "OK" and start your VM
Best Practices
- Start with NAT for general use
- Only use Bridged when necessary
- Use Host-only or Internal for sensitive work
Network Modes
Quick Decision Table for CTFs / Red vs Blue
| Situation | Best Mode | Notes |
|---|---|---|
| Downloading tools, updates | NAT | Safest option for general internet use |
| Hosting multi-VM labs | NAT Network or Host-only | Choose based on whether you need host access |
| Attacking/defending services on your real LAN | Bridged | Use private networks; beware of public Wi-Fi |
| Fully isolated malware analysis | Host-only or Internal Network | Best for total isolation from the internet |
| Expecting reverse shells or incoming attacks | Bridged (preferred) or NAT with port forwarding | Bridged is simpler and more reliable |
NAT (Network Address Translation)
- What: Your VM shares your host's IP address
- When to use: Default choice for most situations
- Why:
- Safest option for general use
- VM can access the internet but can't be accessed from outside
- Good for downloading tools and updates
- Protects your VM from direct network attacks
NAT Network
- What: Multiple VMs share the same private network
- When to use: When you need multiple VMs to communicate
- Why:
- VMs can talk to each other
- Still protected from external access
- Useful for setting up test environments
- Good for practicing network attacks between VMs
Bridged
- What: VM gets its own IP on your local network
- When to use: When you need direct network access
- Why:
- VM appears as a separate device on your network
- Can be accessed by other devices on your network
- Useful for testing network services
- Required for some CTF challenges
- Warning: Less secure - your VM is directly exposed to your network
Host-only
- What: VMs can only communicate with the host
- When to use: When you need complete isolation
- Why:
- Most secure option
- No internet access
- Good for testing malware
- Useful for completely isolated environments
Internal Network
- What: VMs can only communicate with each other
- When to use: When you need multiple isolated VMs
- Why:
- Complete network isolation
- VMs can't reach the host or internet
- Perfect for practicing network attacks
- Good for testing network tools
Connecting to the internet
To get your VM connected to the internet it's Network Interface Card (NIC) should be in one of these modes:
- Bridge
- NAT
- NAT Network
Inside your Linux VM, ensure you have an IP address and start reaching out:
# Check your ip address
ip a

# Try and ping cloudflare
ping 1.1.1.1

# Check your public IP address
curl https://ip.trustme.click
VPN Setup
For CTFs, Hack The Box, Red vs Blue exercises, and private labs, you often need to connect your VM to a VPN to access remote networks safely.
The simplest, most portable way across Windows, Linux, and macOS is to run the VPN inside the VM itself.
Hack the Box Guide
HTB has a page on this, you can read that one or continue reading.
Step by Step
-
Install a VPN client inside your VM
For example, install OpenVPN:
sudo apt update sudo apt install openvpn -
Transfer your
.ovpnfile into the VMDownload or copy the VPN configuration file from your CTF provider
-
Connect to the VPN inside the VM
sudo openvpn --config your-config-file.ovpn -
Verify the VPN Connection
Inside the VM, check for the VPN interface (
tun0) and confirm you can reach the CTF network:ip addr # Try and ping a HTB machine ping X.X.X.X
Virtual Machine Network Settings
- Set the VM to use NAT mode in your hypervisor (VirtualBox, VMware, etc.)
- NAT allows the VM to reach the internet (and thus connect to the VPN) without exposing the VM directly to the host network.
Pros and Cons
| Pros | Cons |
|---|---|
| Easiest, fastest setup | VPN config and keys live inside the VM |
| Works identically across Windows/Linux/Mac hosts | If VM is compromised, VPN session could be exposed |
| Full control from inside the VM | Might use a bit more VM resources |
(Optional) Advanced Setup: VPN on Host, VM Routed Through Tunnel
For more advanced setups, you can connect to the VPN on the host and route only VM traffic through the tunnel.
Why Use This Method?
- The VM does not need to manage VPN credentials or config files.
- The VM's traffic is transparently routed through the host’s VPN.
- Adds an extra layer of separation: the VM is unaware it’s using a VPN.
- Reduces risk if the VM is compromised.
High-Level Steps
-
Connect to the VPN on your host machine
- Use OpenVPN client normally.
- Verify you have a VPN interface like
tun0(Linux),utunX(macOS), or a TAP adapter (Windows).
-
Configure the VM to use the VPN interface
- In VirtualBox, set the VM’s Network Adapter to:
- Bridged Adapter
- Attach to the VPN network interface (
tun0, TAP, etc.)
- If the VPN interface is not selectable, a manual virtual bridge may be needed (advanced).
- In VirtualBox, set the VM’s Network Adapter to:
-
Ensure Only the VM Uses the VPN
- Configure routing rules or firewall rules on the host:
- Ensure that only VM traffic is sent through the VPN.
- Prevent host system traffic from leaking through the VPN unintentionally.
- Example (Linux):
- Use
iptablesorfirewalldto isolate traffic by interface. - Policy-based routing using
ip ruleandip routeif needed.
- Use
- Configure routing rules or firewall rules on the host:
Pros and Cons
| Pros | Cons |
|---|---|
| VM is unaware of VPN, safer in some cases | More complex to set up |
| No VPN credentials inside the VM | Requires careful network and firewall setup |
| Host retains more control over traffic | Platform differences (Linux best, Windows/Mac harder) |
Which Method Should You Use?
| Situation | Recommended Setup |
|---|---|
| Fastest and simplest across all OS | VPN inside the VM |
| Maximum control and separation | VPN on the host, VM bridged to tunnel |
Final Advice
- Start with VPN inside the VM it's faster, safer, and easier to troubleshoot.
- Move to VPN on the host setups only if you need strict traffic isolation, host-controlled routing, or extra security protections.
Essential Tools Installation
Package management basics
Whether you're on a fresh VM, a newly stood up VPS, or running on a docker container, at some point you're going to need to find and install packages and dependencies to get your work done.
If you are in a classroom environment and find yourself in this situation, there's a good chance it's not a mistake - it's the learning objective.
apt: Advanced Package Tool
APT is the standard package manager for Debian-based systems like Ubuntu and Kali. It handles updating your package list, installing software, and resolving dependencies.
Update your package list
Start with this. It fetches the latest list of available packages from the repos:
sudo apt update
Search for a package
To search for available packages related to a keyword:
apt search <term>
Or, to get details on a specific package:
apt show <package>
Install packages
Installing something is simple:
sudo apt install <package>
Some commonly used packages:
# Gives you 'ip', 'ss', 'tc', etc.
sudo apt install iproute2

# netcat (nc), (the good one) flexible networking tool
sudo apt install netcat-openbsd

# Network scanner
sudo apt install nmap

# Terminal multiplexer
sudo apt install tmux

# A great text editor
sudo apt install vim

# Transfer data with URLs
sudo apt install curl

# Version control
sudo apt install git

# pip for Python 3
sudo apt install python3-pip

# For extracting zip files
sudo apt install unzip

# GCC, make, and other build tools
sudo apt install build-essential
``

You can install multiple packages at the same time:

```bash
sudo apt install tmux git curl
If you're ever unsure about what a package gives you, check apt show
Upgrade installed packages
To upgrade everything you've already got installed, not typically something you bother doing in a short lived VM from a recent image:
sudo apt upgrade
pip: Python Package Installer
pip is the standard tool for installing Python packages from PyPI. Before
installing anything, you should almost always be working inside a virtual
environment.
Virtual environments
A virtual environment keeps Python dependencies isolated from the rest of the system. This prevents installing the dependencies of some tool from breaking anything else.
To create one:
python3 -m venv .venv
This creates a .venv directory in your current working directory. This is
typically done at the root of a Python project directory, for example, when
you're working on a cloned repo like impacket, you'd make the
.venv folder there.
Activate the environment:
source .venv/bin/activate
Once activated, your shell prompt will show (.venv) — you're now working inside the isolated environment.
Deactivate when you're done:
deactivate
Installing packages with pip
When inside a virtual environment, using just pip is safe — it's bound to that environment:
pip install requests
However, for clarity and robustness (especially outside of venvs or in scripts), the preferred form is:
python3 -m pip install requests
Some useful packages:
# HTTP library
python3 -m pip install requests

# CTF and exploit dev library
python3 -m pip install pwntools

# Improved Python shell
python3 -m pip install ipython

# Lightweight web framework
python3 -m pip install flask
Checking installed packages
python3 -m pip list
Requirements files
You can capture the current environment's packages to a file:
python3 -m pip freeze > requirements.txt
Later, or on another system, you can recreate the environment:
python3 -m pip install -r requirements.txt
This is the standard way to share or restore a Python project's dependencies.
Text editor
I was nervous before my first day of school. My mother was famously the top of her class, so I asked her how she did so well.
"I took good notes and studied them the night before class"
So that’s what I did.
— An 80-Year-Old Doctor of Mathematics, Genius of Notes
Mastering text manipulation makes you faster, sharper, and more precise. In our world, notes are a source of record, and how we live and breathe. Might as well get good at it.
Visual Studio Code
Probably the text editor with the greatest ease of use. If you're a software developer this might be the only one you need.
If you're brand new and not sure what to choose, this is the one for you.
- Check it out: https://code.visualstudio.com/
vim
It's probably on the *Nix system you're already using, and it can get you very, very far.
Note
If you're going to be doing any system administration or offensive security, it pays to learn
vim. Ifvimis on your system its very likely you also have the programvimtutor- fire that thing up and go through it once a day until it's in your fingers.
A good starting .vimrc
This command will overwrite your $HOME/.vimrc make sure there's nothing in
there you wanna keep!
cat << EOF > $HOME/.vimrc
filetype plugin indent on
syntax enable

" be more vim, less vi
set nocompatible

" better searching!
set incsearch
set ignorecase
set hlsearch

" spaces!
set expandtab
set shiftwidth=4
set softtabstop=4
set tabstop=8

" show line numbers
set number

" save
nnoremap <C-s> :w<CR>

" paste
set paste

" clear highlight by pressing enter
nnoremap <CR> :noh<CR><CR>

" from :help ins-completion
function! CleverTab()
   if strpart( getline('.'), 0, col('.')-1 ) =~ '^\s*$'
      return "\<Tab>"
   else
      return "\<C-N>"
   endif
endfunction
inoremap <Tab> <C-R>=CleverTab()<CR>
EOF
Neovim
I used to think there wasn't a big difference between regular ol' vim and
Neovim (nvim), man was I wrong. Neovim really is the next evolution of vi,
its plugin ecosystem is far beyond what vim could hope for.
For casual vim users there is no practical difference, so it's a safe drop-in
replacement.
- https://neovim.io/
- This is a good starting point for making
nvimfeel like something modern: https://github.com/nvim-lua/kickstart.nvim
Security tools
- For as many people, there's that many oppinons on what tools to use
- Which is to say, what really matters is that you need to find the tools that work for you
- ctf101 has a list https://ctf101.org/faq/recommended-software/
Docker and docker-compose
- what is docker?
- what is docker-compose?
- why are containers important for CTFs?
- what is the bare minimum commands to get by?
Kali as a docker container
- kali is a full distro
- it's also a container
- usethebox won't reccomend using kali or other security focused distros
- BUT, sometimes it's easier to just grab kali than it is to install a tool you want to try
- SO, don't use kali for your OS, use it as a container and get all the benifit without any of the detractions
Source Code Fundamentals
Cloning repositories
Building tools from source
Challenge types
Jeopardy-style CTFs are puzzle-based competitions where you solve self-contained challenges across categories like web, reverse engineering, or forensics. Each challenge has a point value based on difficulty. Solve it, get the points, move up the leaderboard.
Unlike attack/defend CTFs, there’s no live hacking or defense. Just the puzzle and your skills. You can solve challenges in any order, solo, or as a team.
For another attempt at describing what CTFs are and why you might want to participate in one, check out ctf101.org.
Next, we’ll break down common challenge formats and types: socket, web, reverse engineering, and forensics. Let’s dive in.
Socket Challenges
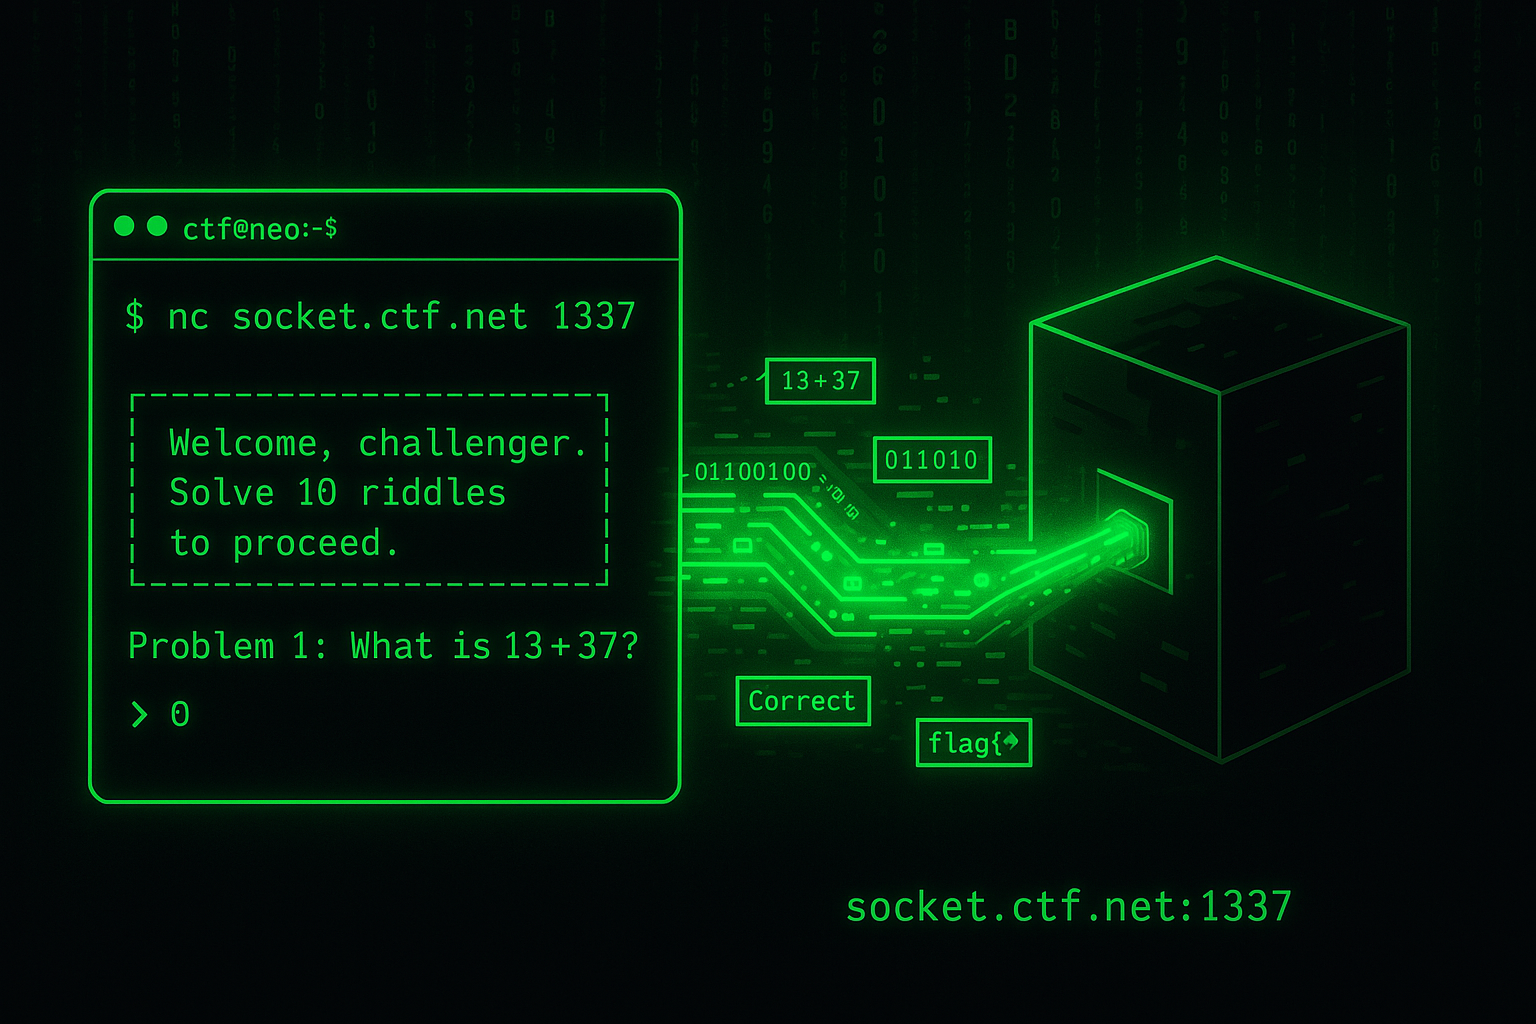
Socket-based CTF challenges are all about interacting with a remote service.
You're given an IP address and port.
When you connect - usually with nc (netcat) - you’re met with a puzzle, a prompt, or just silence.
Your job is to figure out what the service expects, send the right input, and earn the flag.
Most challenges follow a pattern: connect, receive a problem (like math, decoding, or trivia), respond correctly, and repeat. Some run through 50 rounds, others just need one good answer. You’ll often need to script your solution to keep up, especially if the problems are time-sensitive or follow a strict input format.
Watch for clues in the interaction: newlines (\n), specific byte counts, or delimiter characters tell you how to format your response. If you’re lucky, the challenge will include source code - read it! Knowing exactly what the service expects turns guesswork into certainty.
In short: connect with nc, pay attention, automate when needed, and don’t flood the wire.
The box is speaking—listen closely.
Web Challenges
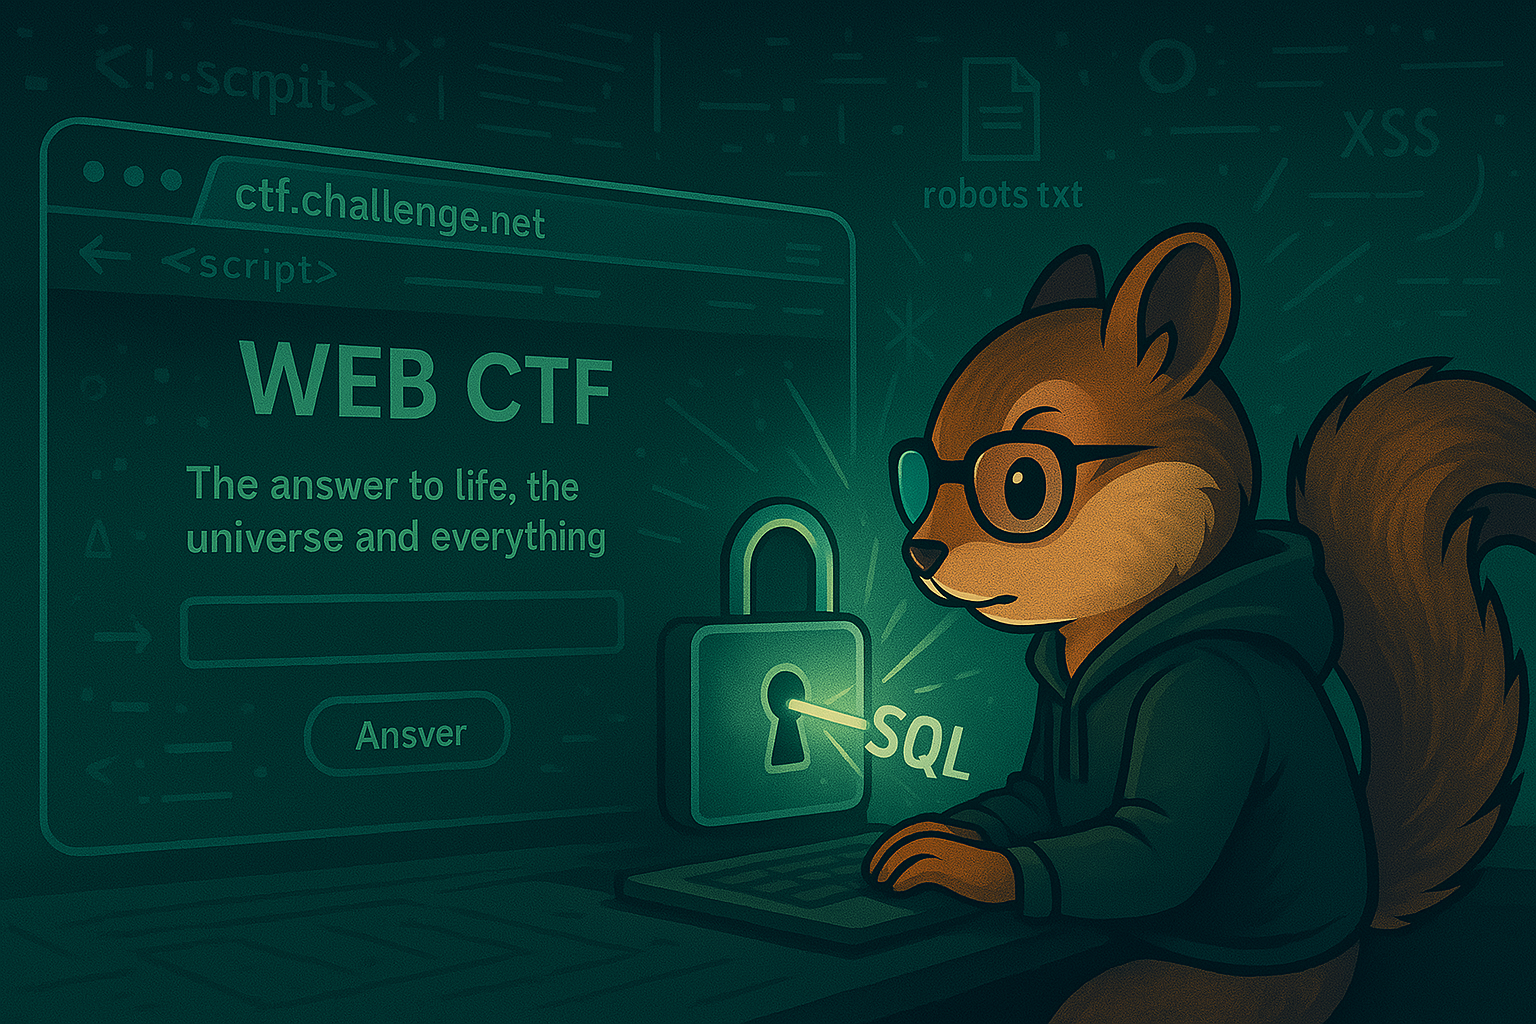
In web challenges, you’re handed a URL and told: "Find the flag." It looks like a normal website—but something’s off. Your job is to poke, prod, and break it.
You might find hidden routes, vulnerable forms, insecure cookies, or even a search box that’s wide open to injection.
Anything from HTML comments to misconfigured sessions could be the key.
Start with your browser’s DevTools, then move to curl or a proxy tool like Burp.
Sometimes you’re guessing inputs. Sometimes you’re solving puzzles. Sometimes there’s a form asking you for "the meaning of the universe." Whatever it is - view source, look closer, and never trust the UI.
Reverse Engineering

Reverse engineering challenges give you a compiled file—or sometimes obfuscated script - and say, "Figure it out." There’s often no server, just something that hides a flag. Your job? Dissect and outsmart it.
Start by running it - see what it prints, what it asks, what it hides. Then go deeper: use strings, decompile it in Ghidra or IDA, or debug it line by line. If source is provided, it can help you trace the logic and find the flag.
Some challenges are friendly puzzles. Others throw obfuscation, anti-debugging, or fake logic at you. But every one is solvable - with the right tools and a bit of stubborn curiosity.
Forensics

Forensics challenges drop you into the aftermath: a messy file, packet capture, or image dump with something hidden inside. No clear instructions - just data, clues, and your curiosity.
You might need to analyze network traffic (.pcap), recover deleted files, extract hidden messages from images, or dissect file formats byte by byte. Tools like Wireshark, binwalk, and strings are your starting point - but knowing what looks “off” is key.
It’s slow work sometimes. You’re sifting through noise for one small signal. But when you finally carve out that flag from deep in the bits, it feels like magic. Digital archaeology at its finest.
Running Challenges Local
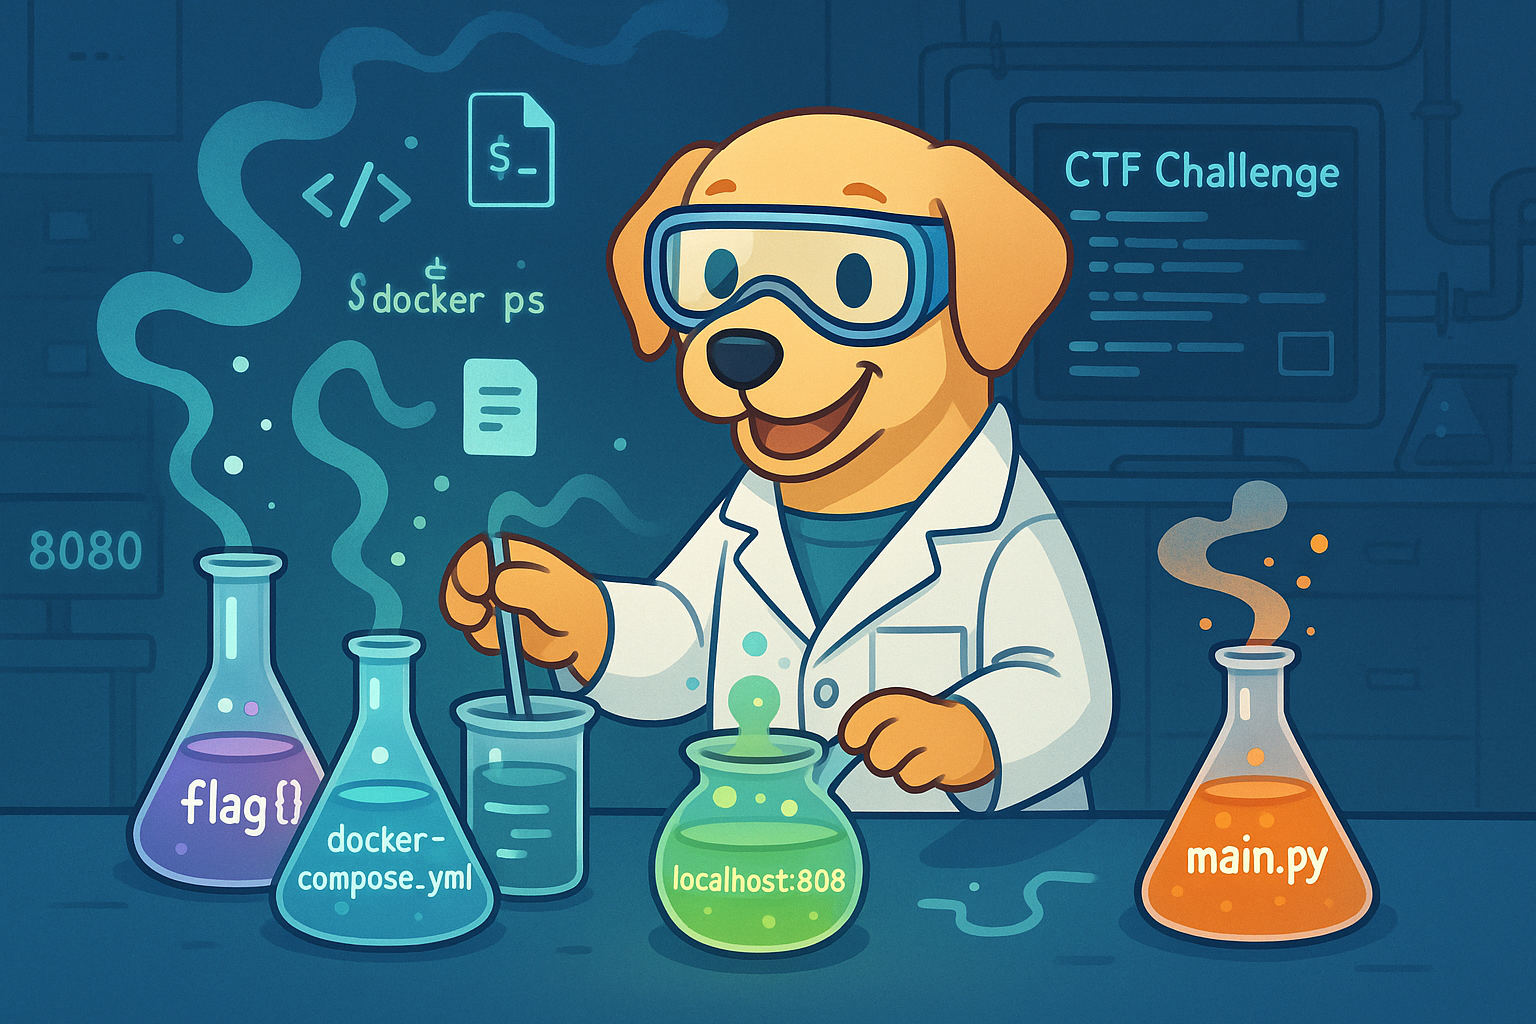
Imagine signing up for a CTF challenge and finding not only a port/IP to connect to, but a bunch of files too. You’ve likey been handed a Docker container or a bundle of source code. For many new players, this is confusing – are you supposed to run the challenge yourself? Yes! CTF challenge materials often include crucial information that the creator has given you, sometimes an entire playground to set up on your own machine. Rather than attacking a distant server, blindly, you’ll be launching the server (or program) locally and interacting with it right on your own computer. This might feel unusual at first, but it’s actually an invitation to dive deeper. You get to peek “under the hood” and freely restart or tinker with the challenge without worrying about crashing a shared remote service. It’s your own sandboxed arena, so dive in!
Running the challenge locally lets you step into the shoes of the creator. You can explore how it works, restart it whenever you want, and dig into files or code that are usually hidden. Some challenges expect you to run it locally to spot things you'd never notice as a remote attacker. This mindset shift is powerful: instead of just a hacker, be a curious investigator. Poke around the files, read any docs or comments, and consider What did they intend me to learn here?
So, what should you do when given extra files with your challenge?
First, get it running.
Navigate to the challenge directory and launch the environment – usually the instructions or files hint at how.
Often it’s as straightforward as running docker compose up (or a similar command) to spin up the service in a Docker container
Once it’s running, find the exposed port (docker ps and config files can help), then connect like you would with any remote challenge - browser, curl, nc.
The key difference? This time, you control the whole environment.
Why docker?
Running containers
Service discovery
Reading docker-compose files
Source Code
Socket Challenges
Web Challenges
Reverse Engineering
Forensics
Docker
Docker Compose
Source Code
Over the Wire - Bandit
Level 0
Setup / Resources
- Install
sshviaapt man ssh
Expand for walkthrough steps
Step 0
ssh bandit.labs.overthewire.org -p 2220 -l bandit0
Password:
bandit0
Read the MOTD (message of the day)
Bandit - Level 1
Setup / Resources
man cdman lsman cat
Expand for walkthrough steps
Step 0
ssh bandit.labs.overthewire.org -p 2220 -l bandit0
Password:
bandit0
ls
pwd
file readme
cat readme
Read the readme file
Bandit - Level 2
Setup / Resources
man cdman lsman catman bash
Expand for walkthrough steps
Step 0
ssh bandit.labs.overthewire.org -p 2220 -l bandit1
Password from Level 1
Step 1
Faiure is always a good start
ls
ls -al
cat -
# termainal is hung
# ctrl + c
Why didn't that work?
What does
man catsay about standard input in theDESCRIPTIONsection
Step 2
Read The Scroll of Truth
man bash
# search by typing /
# search for "Redirecting Input"
And Stack Overflow
From: https://unix.stackexchange.com/a/16364
Using - as a filename to mean stdin/stdout is a convention that a lot of programs use. It is not a special property of the filename. The kernel does not recognise - as special so any system calls referring to - as a filename will use - literally as the filename.
With bash redirection, - is not recognised as a special filename¹, so bash will use that as the literal filename.
When cat sees the string - as a filename, it treats it as a synonym for stdin. To get around this, you need to alter the string that cat sees in such a way that it still refers to a file called -. The usual way of doing this is to prefix the filename with a path - ./-, or /home/Tim/-. This technique is also used to get around similar issues where command line options clash with filenames, so a file referred to as ./-e does not appear as the -e command line option to a program, for example.
Step 3
cat ./-
or
cat < -
Use the contents of this file as the password for the next level.